Hydrangeas are a much-loved garden plant known for their opulent, globular blossoms and variety of eye-catching colors. They’re versatile, hardy, and surprisingly easy to propagate. One common method is via cuttings, allowing you to grow a whole new plant from a small piece of an existing one. In this article, we will discuss a step-by-step guide on how to grow new hydrangeas from cuttings.
Materials Needed:
- A healthy hydrangea plant
- Pruning shears or a sharp knife
- Potting soil (well-draining)
- Perlite or vermiculite
- Rooting hormone (optional)
- A container or pot
- Plastic bags or a plastic cover
Steps to Propagate Hydrangeas from Cuttings:
Step 1: Choosing Your Cutting
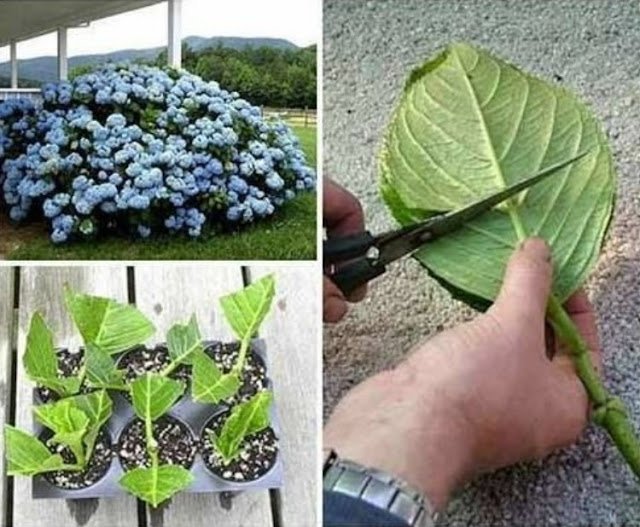
The first step in propagating hydrangeas is to choose the right cutting. Look for a branch that’s healthy, strong, and not flowering. It’s recommended to select a branch with new growth, which you can identify by its lighter color and softer texture. The cutting should be about 5-6 inches long, with several sets of leaves.
Step 2: Preparing the Cutting
Using your pruning shears or a sharp knife, cut the selected stem at a 45-degree angle. This increases the surface area for roots to develop. After you’ve made the cut, remove all but the top two leaves from the stem. You can also cut these leaves in half to reduce water loss through transpiration.
Step 3: Applying Rooting Hormone
While this step is optional, a rooting hormone can significantly improve your success rate. Dip the cut end of your stem into the rooting hormone, ensuring it’s thoroughly coated. This encourages root development at the site.
Step 4: Planting the Cutting
Prepare a container with a mix of well-draining potting soil and perlite or vermiculite. Make a hole in the center of the soil mix, deep enough to accommodate the cutting without the leaves touching the surface. Place the cutting in the hole and firm the soil around it to ensure it stands upright.
Step 5: Creating a Mini Greenhouse
To create a high-humidity environment, cover the pot with a plastic bag or plastic cover. This simulates a greenhouse environment and helps the cutting retain moisture, which is essential for root development. Make sure the plastic doesn’t touch the leaves to prevent rotting.
Step 6: Caring for Your Cutting
Place the pot in a location with bright, indirect light. Direct sunlight can cause the cutting to dry out and die. Regularly check the soil moisture level. It should remain consistently damp but not waterlogged. If you notice condensation on the inside of the bag, you can open it for a few hours to let excess moisture escape.
Step 7: Checking for Root Growth
After 2-4 weeks, check for root growth by gently tugging on the cutting. If you feel resistance, it means the roots have started to grow. Once the cutting has a robust root system, it can be transferred to a larger pot or directly in the garden, depending on the season and climate.
Step 8: Transplanting Your New Hydrangea
When your new hydrangea is ready to move, choose a spot in your garden that gets morning sun and afternoon shade. Hydrangeas prefer well-drained soil that’s rich in organic matter. Dig a hole twice the size of the root ball, place the plant in the hole, fill it with soil, and water it well.
Remember that patience is key when it comes to propagation. Not every cutting will take root, and that’s perfectly okay. The process of growing hydrangeas from cuttings may be a trial and error, but the reward of seeing a new plant flourish makes it all worth it. Happy gardening!